Timon Harz
August 15, 2024
Top Features of Oneboard: A Complete Guide
Explore the key functionalities that set Oneboard apart in the digital note-taking landscape.
In this guide, we’ll walk you through the core features of Oneboard and how to make the most out of the app.
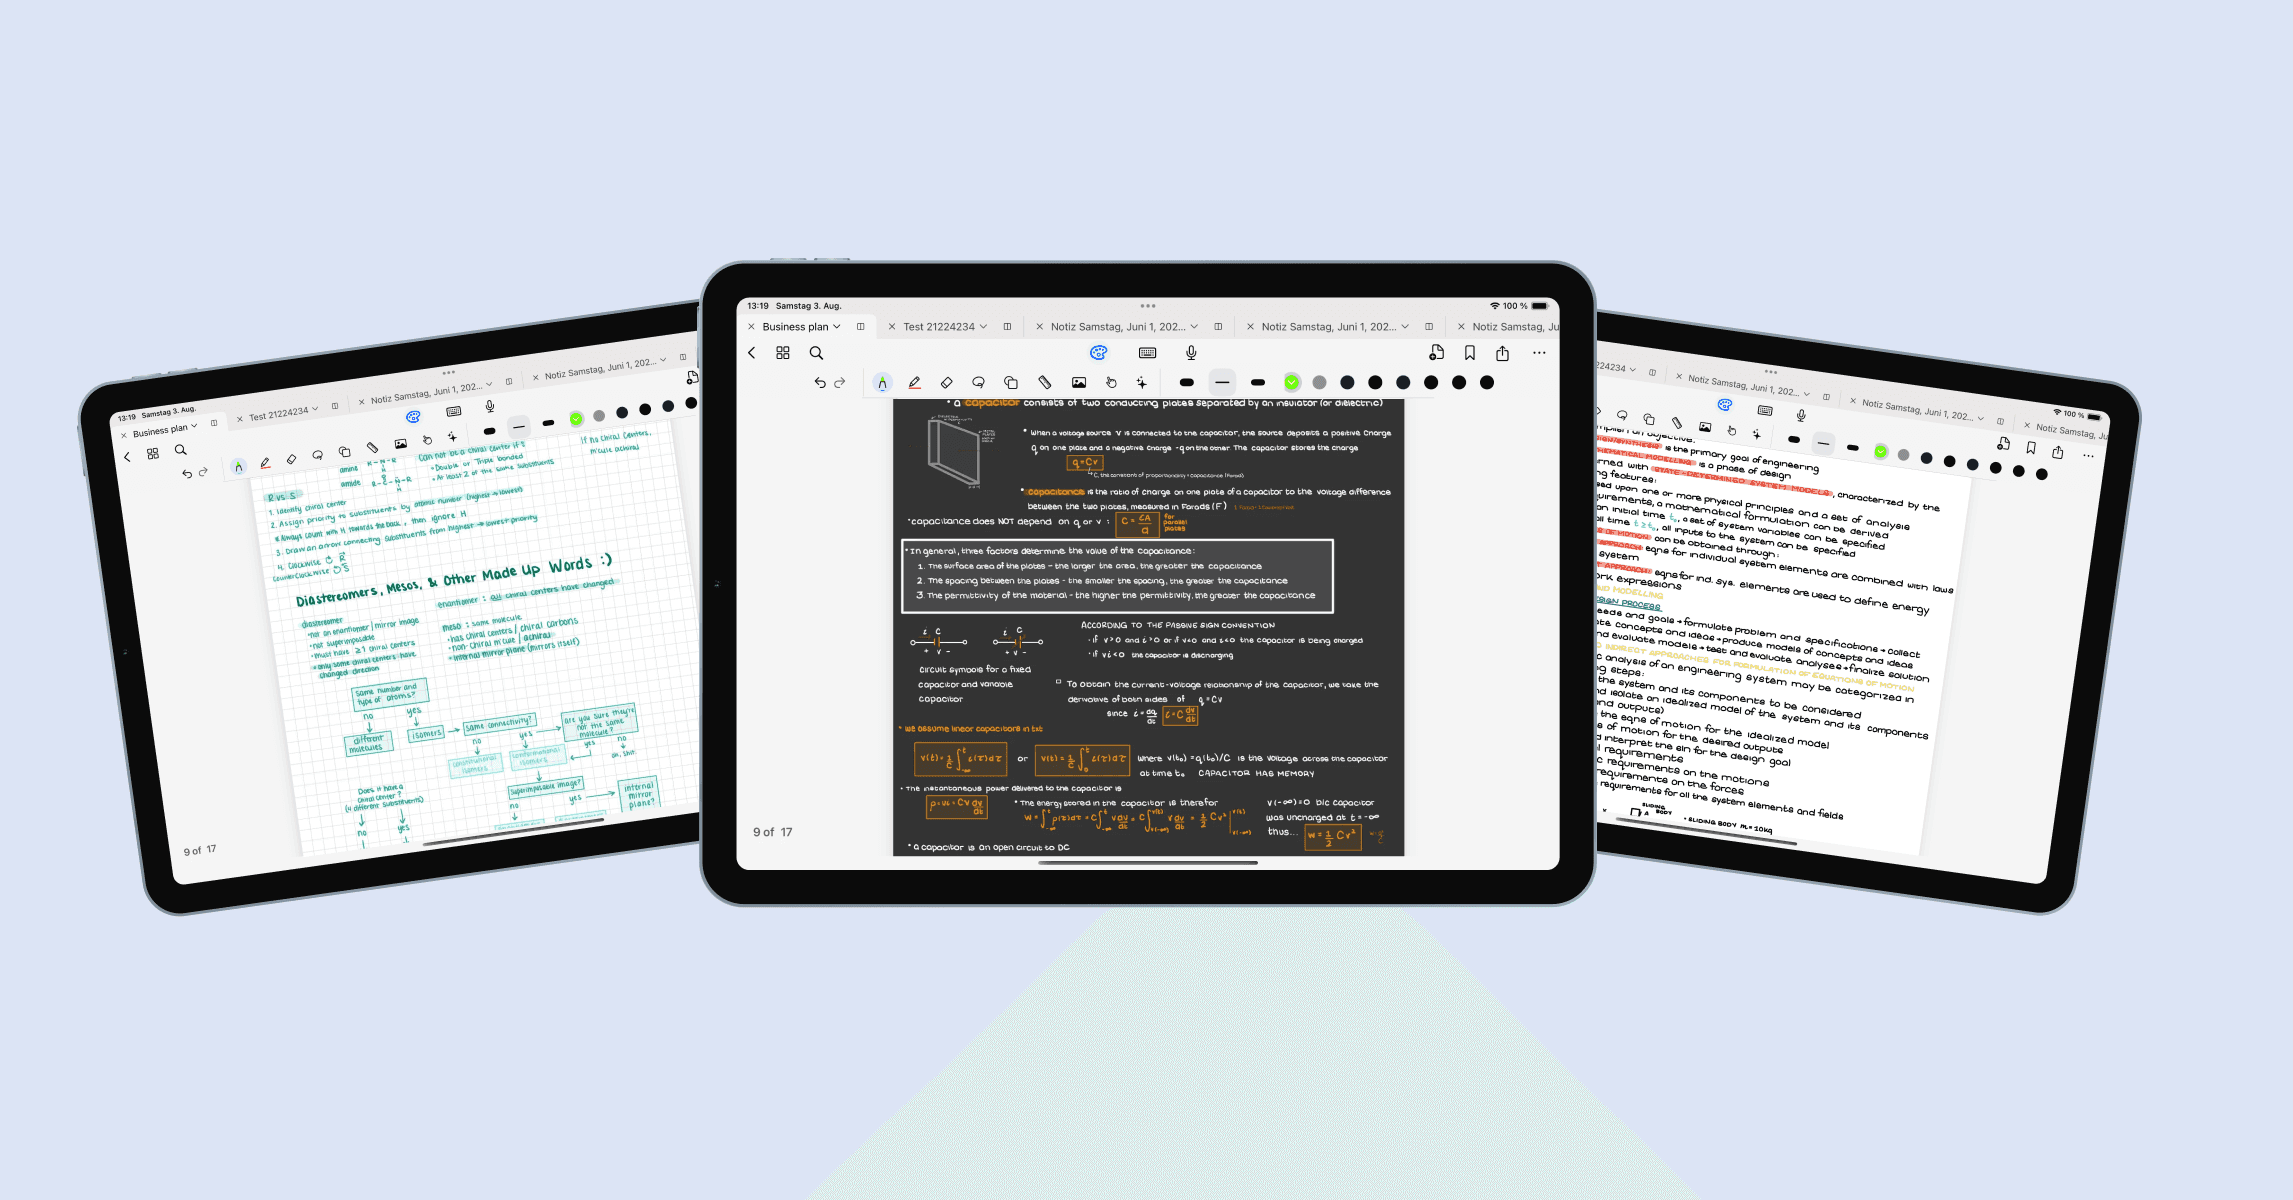
1. Getting Started with Oneboard
The first step is downloading Oneboard from the App Store. Once installed, open the app to begin creating your first note.
Creating a New Notebook
Tap the "+" button on the homepage to create a new notebook.
Customize your notebook by choosing from a variety of cover styles and page templates (lined, grid, dotted, blank).
Name your notebook and get started with a blank canvas that can handle typed or handwritten notes.
Importing PDFs
If you prefer annotating over existing materials, Oneboard allows you to import PDFs easily:
Tap the "Import" button and select a PDF from your files or cloud storage.
Oneboard will automatically load the PDF, and you can start making annotations right away.
2. Taking Notes with Oneboard
Oneboard allows you to combine handwriting, typing, and drawing all in one place.
Handwriting Mode
One of the standout features of Oneboard is the smooth and responsive handwriting experience:
Select the pen tool from the toolbar and choose from various pen types, colors, and thickness options.
Use the highlighter tool to emphasize important sections.
Tap the "Lasso" tool to move, resize, or delete handwritten elements.
With Apple Pencil integration, Oneboard provides an effortless writing experience that feels as natural as pen on paper.
Typing Notes
If typing is more your style:
Tap the "Text" tool to add a text box anywhere on the page.
Customize the font, size, and color to match your style.
Move text around the page by tapping and dragging the text box.
Organizing with Templates
Oneboard offers various templates to help structure your notes, from study planners to project management grids. These templates can help you stay organized, manage your tasks, and keep track of your academic or personal goals.
3. Organizing Your Notes
Once you've created multiple notebooks or pages, Oneboard makes it easy to keep everything organized.
Creating Folders
Group similar notebooks together by creating folders.
Simply drag and drop notebooks into folders to better categorize your subjects or projects.
Tags and Search
Tags make it easy to find specific notes:
Add tags to your pages to categorize content by subject, project, or keyword.
Use the built-in search function to quickly find any note, phrase, or tag.
Rearranging Pages
To change the order of your pages:
Tap the "Pages" icon to view thumbnails of all pages in the notebook.
Drag and drop pages to rearrange them as needed.
4. Advanced Features for Power Users
As you become more familiar with Oneboard, there are a few advanced features that can take your productivity to the next level.
Text Recognition (OCR)
Oneboard’s Text Recognition (OCR) allows you to convert handwritten notes into typed text. This is perfect for turning your class notes or brainstorming sessions into readable, searchable documents.
Select the "Lasso" tool and encircle your handwritten text.
Tap "Convert" and watch Oneboard turn your handwriting into text.
Drawing and Sketching Tools
For creatives and visual learners, Oneboard offers a suite of drawing tools:
Use the Shape tool to create perfect lines, circles, and squares.
Add layers to your drawings for more detailed illustrations.
The “Move” tool allows you to resize and rotate drawings with ease.
5. Exporting and Sharing Notes
Once you’ve finished taking notes, Oneboard allows you to export them in various formats:
Export pages or entire notebooks as PDFs, images, or Oneboard files.
Share your notes via email, cloud services, or Airdrop.
This is ideal for collaborating with classmates or sharing project ideas with colleagues.
6. Maximizing Productivity with Oneboard
To truly master Oneboard, it's important to incorporate it into your daily routine. Here are some tips for getting the most out of the app:
Create a Study Routine
Use Oneboard to plan your study sessions by creating dedicated notebooks for each subject. With the ability to combine PDFs, handwritten notes, and images, you can centralize all your study materials in one place.
Take Visual Notes
Visual learners will appreciate Oneboard’s drawing tools and templates. Use mind maps, diagrams, and sketches to better understand complex concepts.
Sync Across Devices
Keep your notes with you, whether you're on your iPad or iPhone. Oneboard syncs seamlessly across devices, ensuring you always have access to your notes wherever you are.
7. Why Choose Oneboard?
Unlike other note-taking apps, Oneboard is built with simplicity and power in mind. Whether you're a student managing a busy academic schedule or a professional organizing project ideas, Oneboard makes note-taking intuitive and effective.
With features like:
Seamless handwriting and text integration
PDF import and annotation
Powerful organizational tools
Text recognition (OCR)
Creative sketching and drawing options
Oneboard empowers users to create beautiful, organized notes in a way that works for them.
Conclusion:
Oneboard is more than just a note-taking app – it’s your digital notebook, sketchpad, and project organizer rolled into one. With its simple yet powerful features, it adapts to your workflow, making your study sessions more productive and your creative projects more organized. Ready to take your note-taking to the next level? Download Oneboard today and see the difference!
Press contact
Timon Harz
oneboardhq@outlook.com
Other posts


Company
About
Blog
Careers
Press
Legal
Privacy
Terms
Security